First, I created a Java Web application and selected the Spring MVC Framework. I confirmed the choice to include JSTL.
The Spring Framework JAR files and the JSTL JAR files are included.
The web.xml file includes a reference to a local configuration file, a context listener for the Spring Framework, a servlet that implements the Spring dispatcher, a mapping that sends all .htm files to the dispatcher servlet, a session timeout of 30 minutes, and the name of the welcome file as redirect.jsp.
The local configuration file is for beans that access a database.
An additional config file is added for the dispatcher servlet. It adds a mapping that refers the index page to the index controller. All other controllers will use the default mappings for Spring. The file also adds rules to transform names into pages. The last tag declares the index controller with its default view.
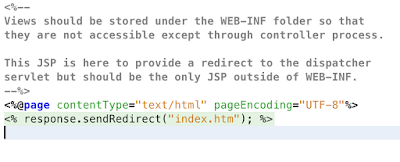
 The redirect.jsp uses embedded java to call the sendRedirect method from the response. The welcome file is redirect.jsp.
The index.htm is significant, since the dispatcher servlet is mapping the file name index.htm to the index controller. If the name in the redirect.jsp is changed, then the key for the property for the indexController must be changed, too.
The index controller sets the view name as index, which forces the viewResolver to create the URL /WB-INF/jsp/index.jsp. Change the prefix to change the path to the JSPs, change the suffix to map to a different type of file.
Normal controllers will use a different naming convention to resolve views. The index controller is different. Any path can be used to map to the index controller, then the index controller will present its view.
Application Context
ApplicationContext is used to create beans. BeanFactory is used to create beans, too. BeanFactory is simpler and its functionality is included in ApplicationContext.
AbstractApplicationContext allows registration of a callback for the destruction of a bean. The destruction callback is not called if scope is set to prototype, since Spring does not manage the entire life cycle of the bean. The initialization and destruction callback names can be set in the opening beans tag in the Beans.xml file. This will set the name of the callbacks for all beans.
To see how the destroy method works, save the application context as an AbstractApplicationContext and call the registerShutdownHook() before closing the application.
BeanPostProcessor
Adding a bean that implements BeanPostProcessor allows for callbacks before and after initialization and destruction.
Injection with XML
package com.tutorialspoint;public class TextEditor {
private SpellChecker spellChecker;
private GrammarChecker grammarChecker;
public TextEditor(GrammarChecker grammarChecker) {
this.grammarChecker = grammarChecker;
}
// a setter method to inject the dependency.
public void setSpellChecker(SpellChecker spellChecker) {
System.out.println("Inside setSpellChecker." );
this.spellChecker = spellChecker;
}
// a getter method to return spellChecker
public SpellChecker getSpellChecker() {
return spellChecker;
}
public void spellCheck() {
spellChecker.checkSpelling();
}
public void grammarCheck() {
grammarChecker.checkGrammar();
}
}
Injection is handled with XML using property and constructor-arg. Use ref when a constructor arg is to a bean. For a setter/getter configuration, use a property that contains an inner bean.
Autowiring
TutorialsPoint does not go into details about autowiring with XML. Here is another resource: Autowiring with XMLWhen wiring by name, use the name of the property in the bean, not the name of the variable that the property encapsulates.
When wiring by type, only one bean of the given type can be a property in the enclosing bean.
Wiring by constructor is wiring byType, but limited to the constructor arguments, not the bean properties.
Annotations
To use annotations to configure Spring, modify the Beans.xml file:- Add xmlns:context
- Add schema locations for context and spring-context
- Add a tag for context annotation-config
- Define the beans in Java, not in the XML.
Java Source Code
Use @Configuration to indicate that Spring should read this class for bean configuration.Use @Bean on the constructor of the bean class. The annotation indicates that the return from the method is a bean to be registered with Spring. It is equivalent to a bean declaration in the Beans.xml file with the id and class attributes set. All other attributes will have default values. The id must be unique, but is not relevant to retrieving the bean. The class is used to retrieve the bean.
package com.tutorialspoint.annotation;
import org.springframework.context.annotation.*;
@Configuration
public class BeanConfig {
@Bean
public HelloWorld helloWorld(){
return new HelloWorld();
}
}
Injection
To implement Dependency Injection, create two methods that return the two classes and annotate them with @Bean. Call the constructor of the dependence class from the constructor of the dependent class.
package com.tutorialspoint.annotation.inject;
import org.springframework.context.annotation.Bean;
import org.springframework.context.annotation.Configuration;
@Configuration
public class TextEditorConfig {
@Bean
public TextEditor textEditor(){
return new TextEditor( spellChecker() );
}
@Bean
public SpellChecker spellChecker(){
return new SpellChecker( );
}
}
Import
The @Import annotation allows one config file to be used in another.
Lifecycle Callbacks
The @Bean annotation supports initMethod and destroyMethod attributes to register callback methods.
Bean Scope
Bean scope is controlled with the @Scope annotation. Use it along with the @Bean annotation. The annotation only has one attribute named value, so the attribute name may be omitted.
MVC
Use @Controller to indicate that a class is a controller.
Use @RequestMapping to set the URL to use to access the controller from the web. The annotation can be used multiple times. It can set the URL and also the method to use. The default parameter is the URL, the method is set with the method attribute.
The return value from the method is the name of the view to use to display the response.
package com.tutorialspoint.annotation.mvc;
import org.springframework.stereotype.Controller;
import org.springframework.ui.ModelMap;
import org.springframework.web.bind.annotation.RequestMapping;
import org.springframework.web.bind.annotation.RequestMethod;
@Controller
@RequestMapping("/hello")
public class HelloController {
@RequestMapping(method = RequestMethod.GET)
public String printHello(ModelMap model) {
model.addAttribute("message", "Hello Spring MVC Framework!");
return "hello";
}
}
I was able to run all the examples.


No comments:
Post a Comment